It’s one thing to plan a project. It’s another to monitor progress, make sure you are on track to meet major milestones, and identify potential roadblocks before they cause delays. When you add multiple teams or projects to the mix, these tasks become even more challenging.
Fortunately, Jira offers a solution. It’s called Portfolio, and it provides critical features for developing roadmaps, visualizing progress, estimating time to completion, and more.
Note that Atlassian has rebranded Portfolio for Jira as “Advanced Roadmaps” as of May 13, 2020. It is now available only as part of Jira Software Premium, and not as a separate plugin. Please see Atlassian’s article on the update for additional information. The information in the article below has been updated to reflect this change but still uses the term Portfolio for familiarity’s sake.
Jira Portfolio Basics
Think of Portfolio as the GPS for your Jira projects. It helps you create a plan for managing projects in Jira and allows you to track your team’s progress as they execute it. It also provides features for navigating around unexpected roadblocks, like a task that consumes more resources than expected, in order to keep your projects on schedule even when problems arise.
Portfolio provides a broad set of features to support these goals:
- Roadmap development: Portfolio lets you create a roadmap for Jira projects. Roadmaps include details about the various tasks that need to be completed in order to execute a project, as well as when they are expected to be completed, which teams are responsible for them, and what resources they require.
- Scheduling optimization: Portfolio makes automated recommendations about how to coordinate the scheduling of various tasks within a project — or how to coordinate multiple interrelated projects —to optimize efficiency and minimize the risk of delays.
- Performance estimations: Teams can use Portfolio to estimate how long a specific task will take to complete. They can also compare these estimations with the actual time to completion to assess performance and improve estimation accuracy over time.
- Completion forecasts: With Portfolio, Jira makes its own estimates of when entire projects will be complete, based on the status of issues that are being tracked in Jira.
- Visualizations: The data produced by all of the features described above can be visualized to help teams make sense of the complex information that Portfolio tracks.
It’s certainly possible to manage a project without the help of Portfolio, just as it’s possible to take a cross-country road trip without a GPS. But with Portfolio, teams can systematically plan, track, and measure the outcomes of their projects, no matter how complex they are. In this way, Portfolio removes much of the guesswork and ad hoc planning that comes with managing a complex set of projects.
Given that Jira is widely used by software development teams, software project roadmap management is one of the most common use cases for Portfolio. However, Portfolio can be used to manage roadmaps for virtually any type of project or workflow, from building a house to managing the growth of a company. And because Portfolio is part of Atlassian’s official suite of products and tools, users can be confident that it will receive quality support when deployed as part of Jira.
Portfolio concepts
Teams should master a few concepts that are central to the way Portfolio works:
- Plans: In Portfolio, a plan represents the roadmap that you lay out for the issues you want to track. Plans are flexible and can be structured around a variety of issue sources, such as projects and both Scrum and Kanban boards. Plans are also continuously updated to reflect changes in the issues they encompass.
- Hierarchies: In order to define how different issues within a roadmap relate to each other and set priority levels, Portfolio allows users to create a hierarchy. By default, Portfolio defines three hierarchy levels: epic, story, and sub-task. The epic and sub-task levels correspond to their respective issue types, while the story level includes all other issues. Users can also create custom levels called initiatives, which are typically used as the topmost level of the hierarchy.
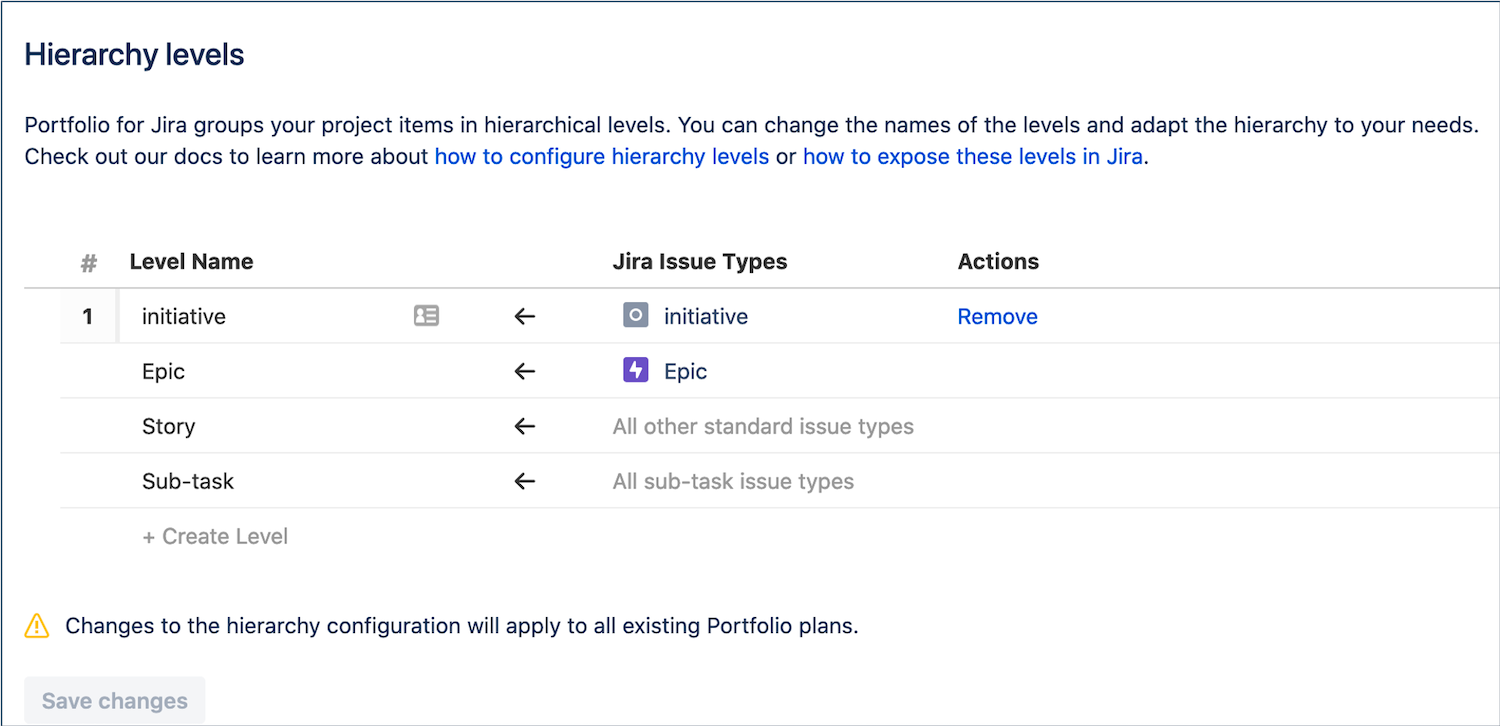
- Programs: Programs are a visualization feature that lets users track and compare multiple plans at once. If your organization is managing multiple large-scale projects simultaneously, programs let you keep track of them all from a single location and compare their progress relative to each other.
- Teams: A team is an individual or group that is assigned a role within a plan. Teams can consist of any Jira users in your organization.
Working with Plans in Jira Portfolio
Plans are the core building blocks of Portfolio, and understanding them is essential to using it effectively.
Creating a Plan
Before customizing plans, you have to create them:
- Select the Plans menu in Jira, then click Create.
- This opens a dialog page. On that page, select Plan and then Create.

- The next step is naming your plan. This can be anything you’d like, although it’s wise to choose a name that is easily identifiable to everyone who will be working with the plan in Jira. You must also specify the privacy settings you’d like to configure for the plan. Click Next when you are done.

- You’ll then be asked which issue sources you’d like to use. As noted above, the issue sources you select determine the way your plan is structured. After you’ve made your selection, click Next.
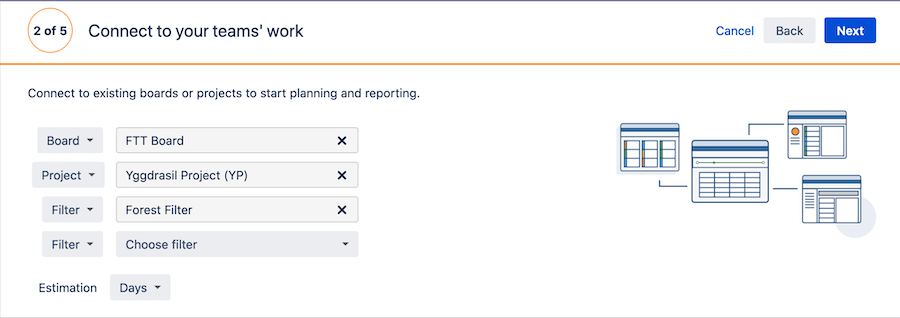
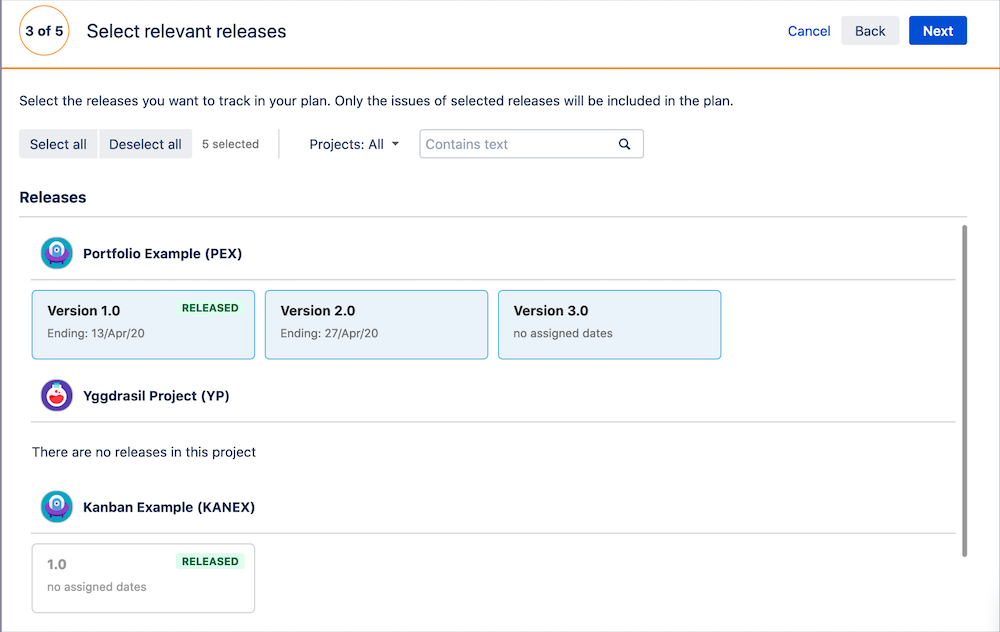
- On the following page, you can select releases to associate with your plan. Releases are the goals within the plan, and while you can skip defining any, doing so at this stage helps ensure you’re including all relevant issues in the plan and also gives your team set objectives to work towards. Click Next to proceed.
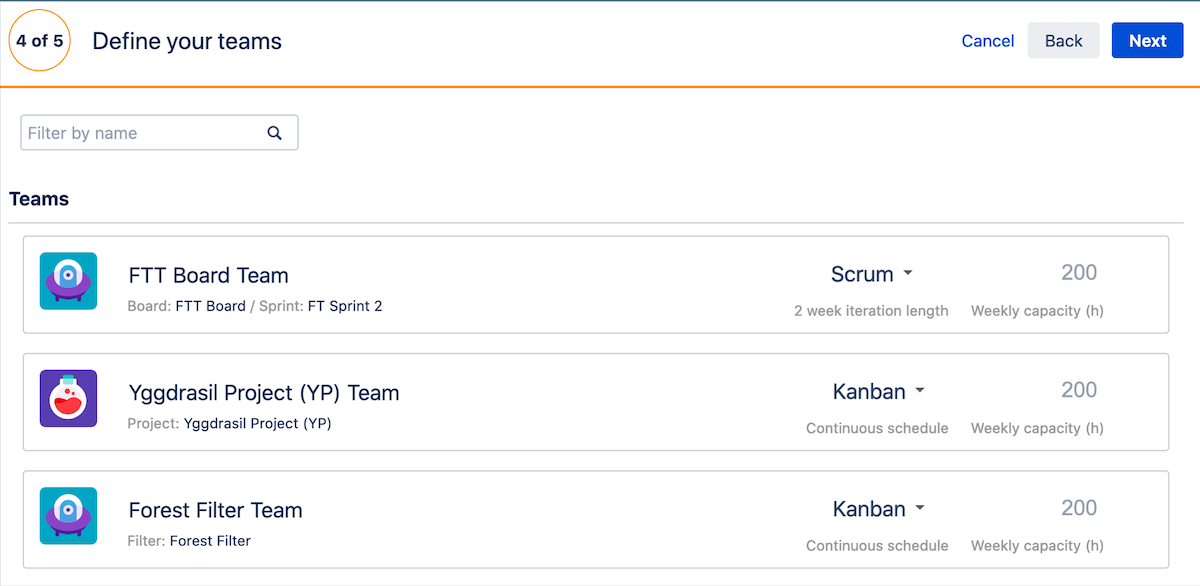
- You must then select teams to use in your plan. Portfolio offers a flexible framework for doing so: it suggests teams to include by default, but allows you to customize them as needed. Teams can be assigned to any number of plans, but you can also create private teams that are assigned only to one specific plan. After adding or removing teams as desired, you can click Next to move to the last step.
- Finally, you must decide which specific issues to include in your plan. Portfolio makes suggestions automatically based on the other information you’ve entered, and you can change the selected issues as needed.
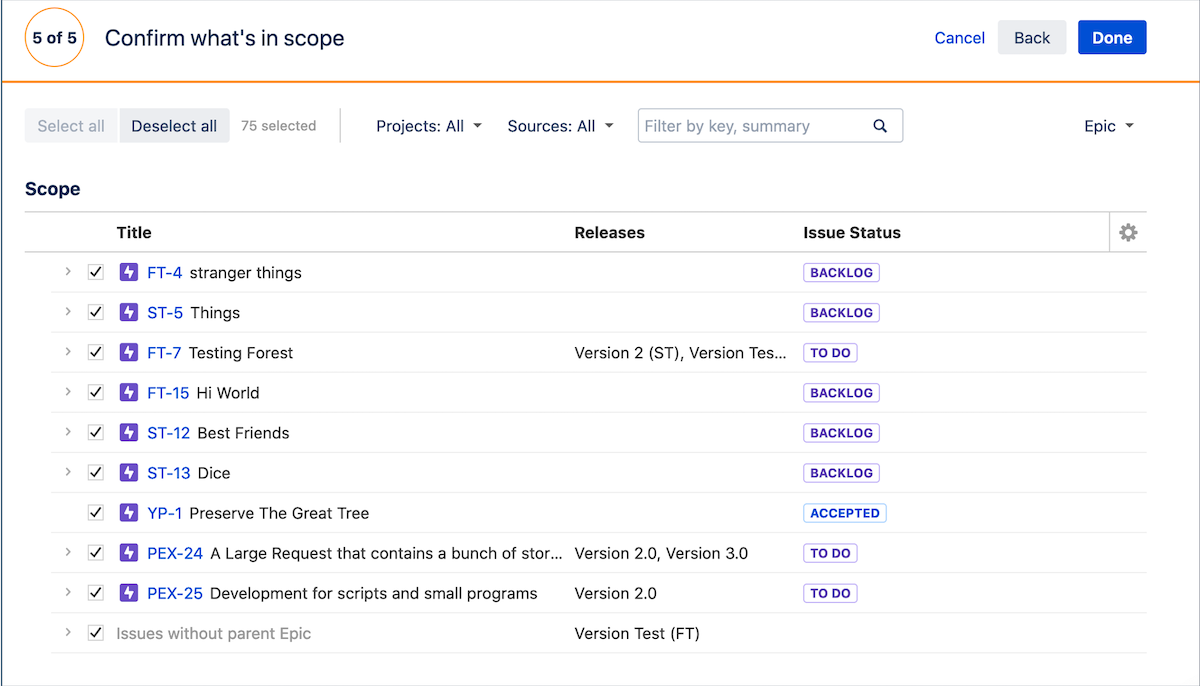
- After you’ve made all of your selections, click Done to create your new plan.
Please note that the step-by-step instructions above are specific to Portfolio for Jira Server and Data Center, but the plan creation process in Jira Cloud is quite similar.
Choosing a Plan Interface
After creating your plan, you’ll have to decide whether you want to use the “improved interface” newly introduced in Portfolio 3.0 or the alternative “live plan” interface. Which interface suits you best will depend on your scheduling needs and which layout you find more intuitive.
The improved interface is the default for all plans created in Portfolio 3.0 and above. It allows you to either schedule issues manually or have Portfolio make scheduling suggestions. Here’s an example of what a plan in the improved interface looks like:
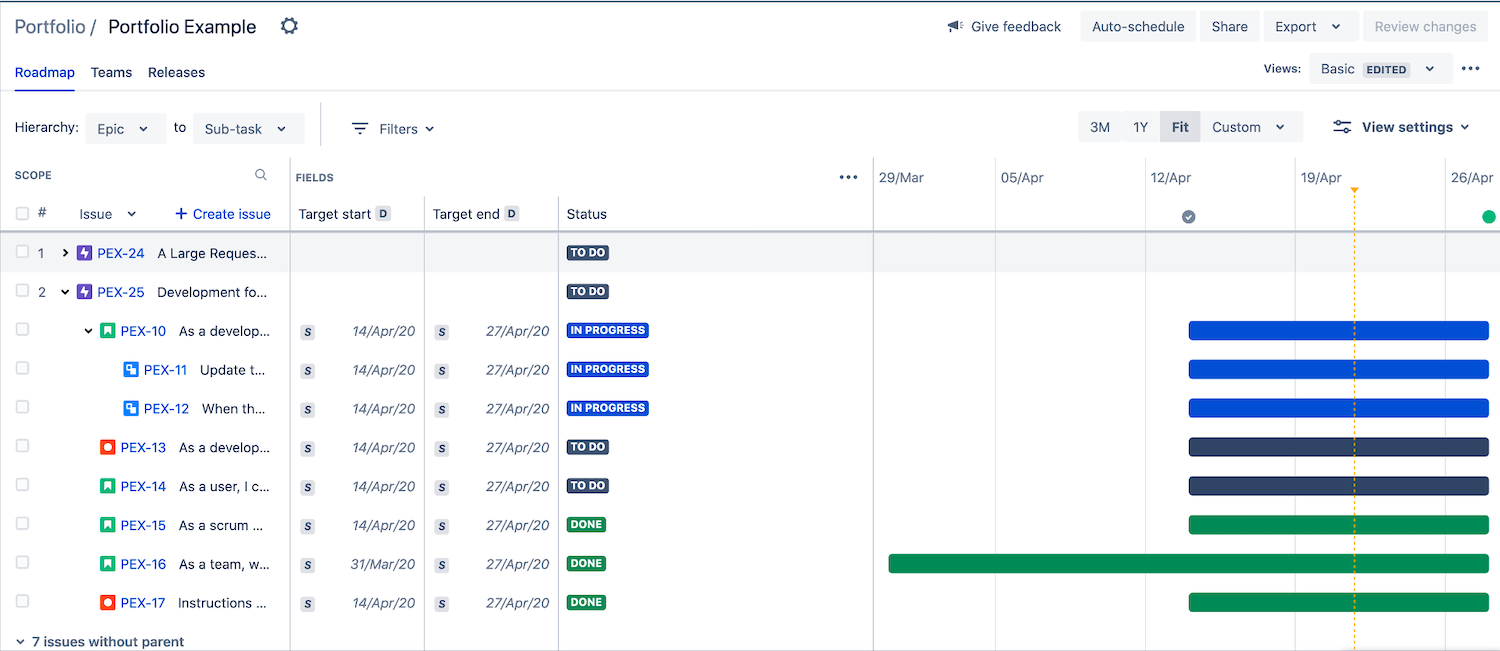
Live plans rely more heavily on Portfolio’s automatic scheduling features, using them to create a schedule without the option for user input. It does so based on a variety of factors, such as dependencies, team schedules and availability, and whether any tasks can be completed simultaneously. The live plan interface is organized differently than the improved interface as well:
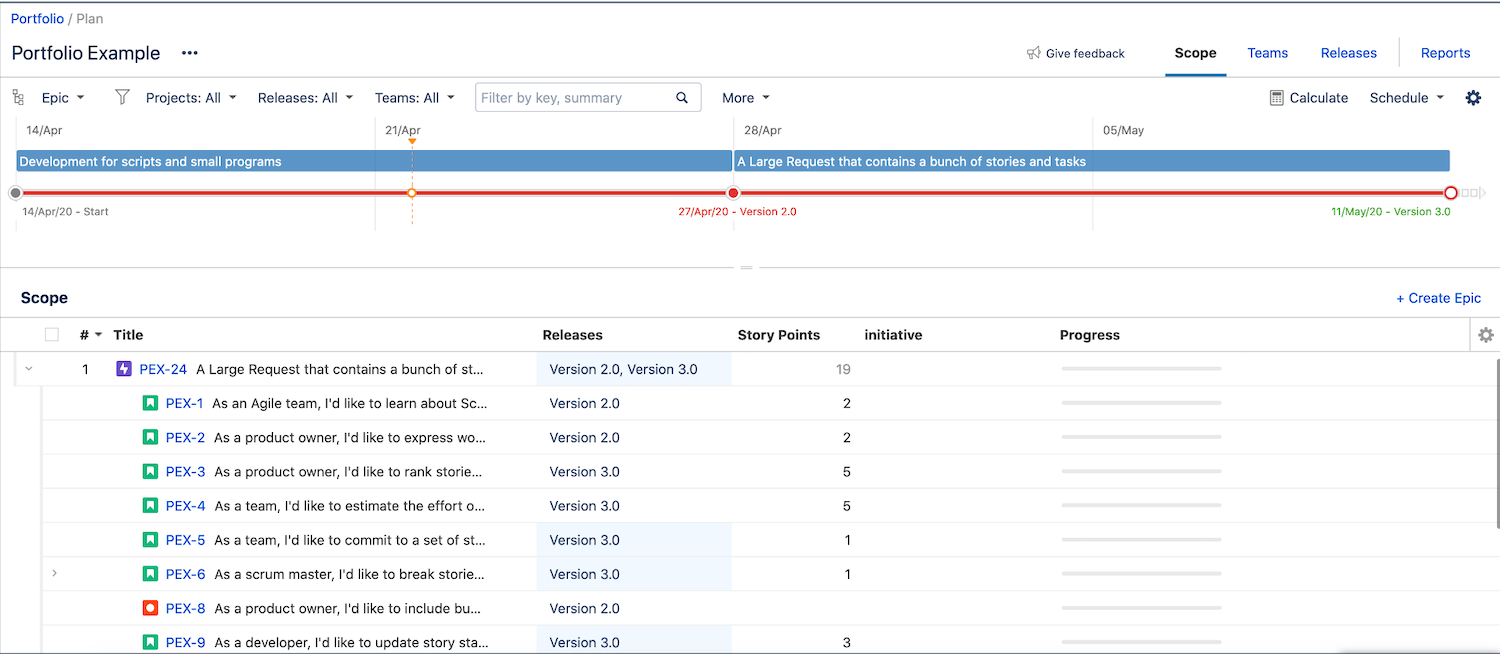
To switch a plan from the default improved interface to the live plan interface, select the gear icon to access the settings menu, click on Configure, then select Planning interface. You can then choose Disable improved interface.
Managing Plans
Once you’ve decided upon your preferred interface, you’re ready to start managing and customizing your plan.
Releases
A release is a milestone within a plan based on the completion of a certain amount of predefined work. Portfolio suggests releases automatically based on the issues you build into a plan, but it gives you the flexibility to customize them to suit your needs. This flexibility extends to scheduling releases: you can either set a fixed date for a release, or you can use a dynamic date that automatically changes based on the issues and resources allocated to it. You can also include multiple releases in a single cross-project release, linking the work of teams across your organization to a common goal and letting you easily track progress towards that objective.
Teams
To view all the teams that have been added to a plan, select the Teams tab in either interface. From there, you can view the details on each team, such as its membership and information related to members’ capacities. You can also delete or customize teams from this screen and change a team’s private status.

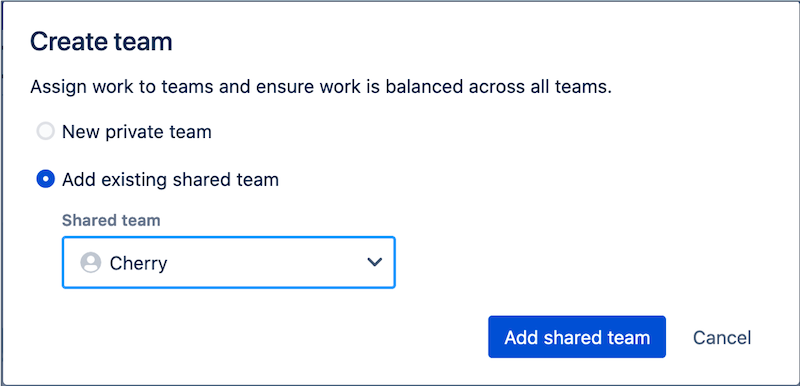
When deciding which team to use in Portfolio, you can either create a new one...
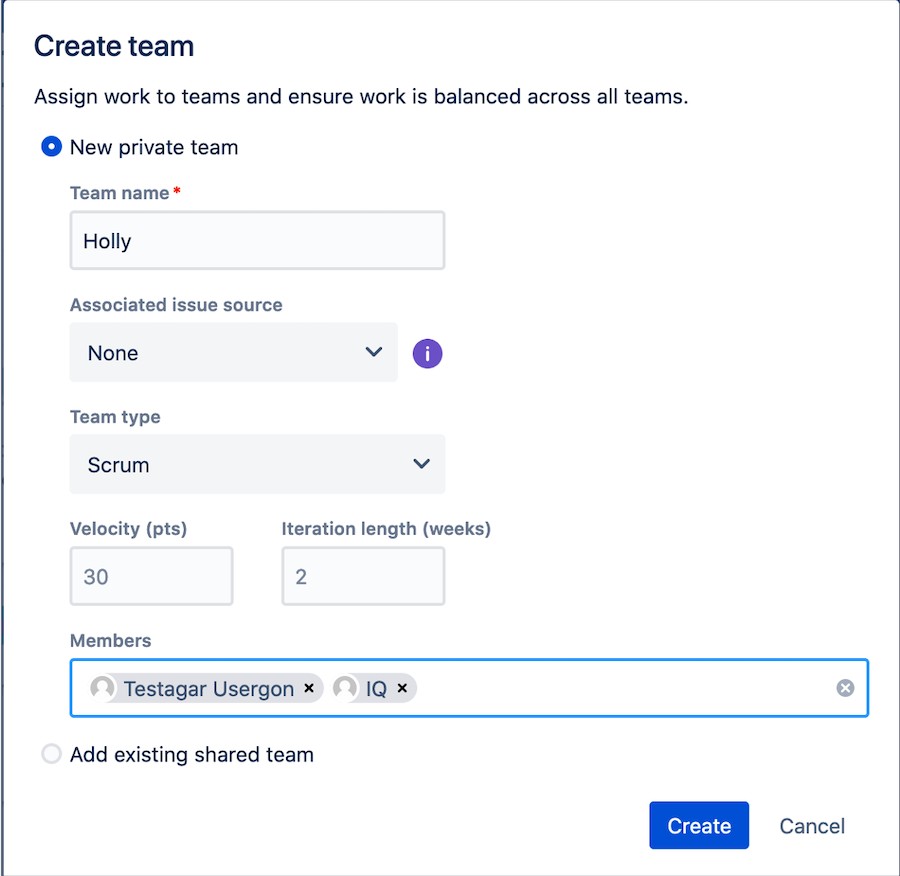
...or use an existing team.
Programs
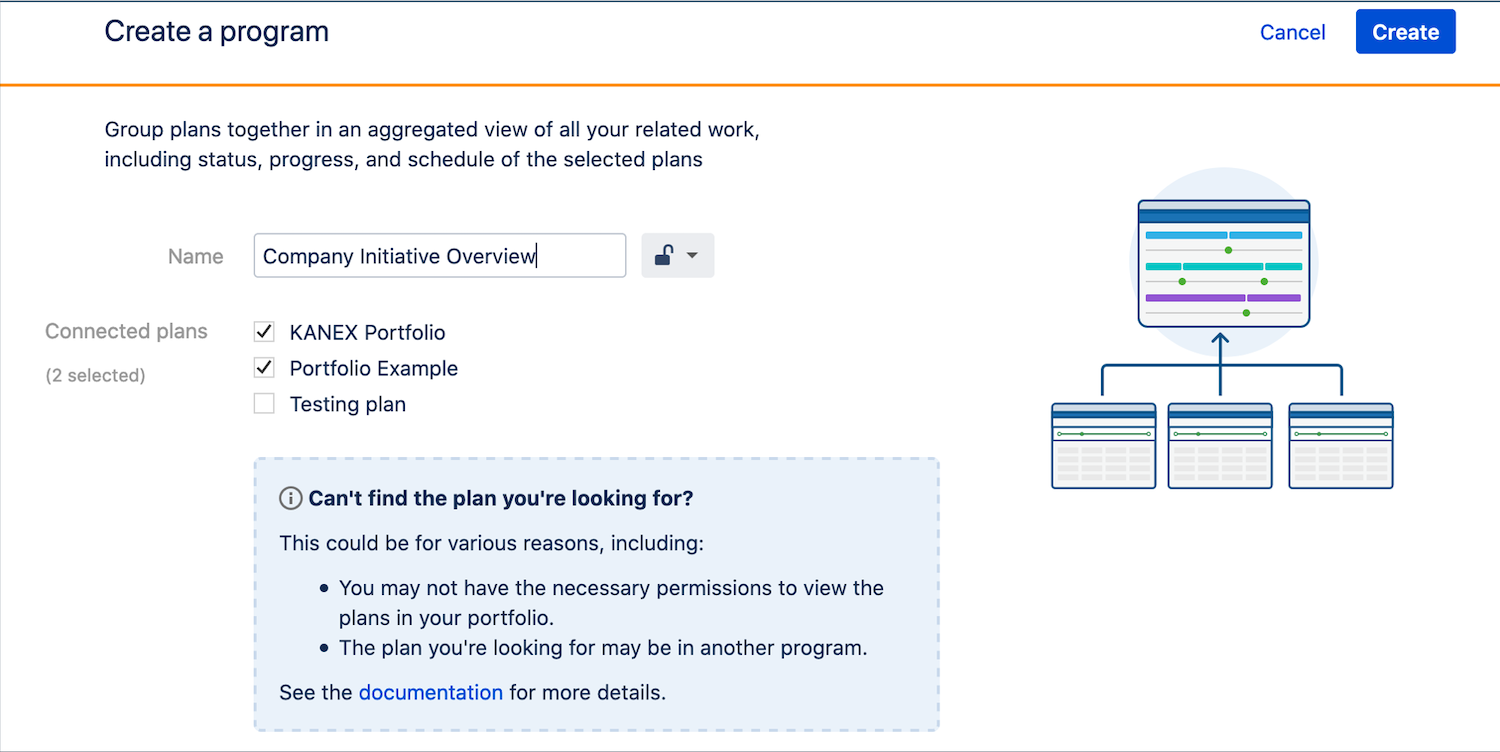
As discussed above, programs allow you to visualize and monitor the status of one or more plans at once, providing a high level view of ongoing work. By using programs, you can easily visualize and track tasks across your entire organization, no matter how many plans you have in place.
You can create a program by selecting Create in the Portfolio menu, choosing Portfolio, and then clicking Create again. You’ll have to give your program a name, specify its privacy settings, and finally select which plans to include in the program.
Views
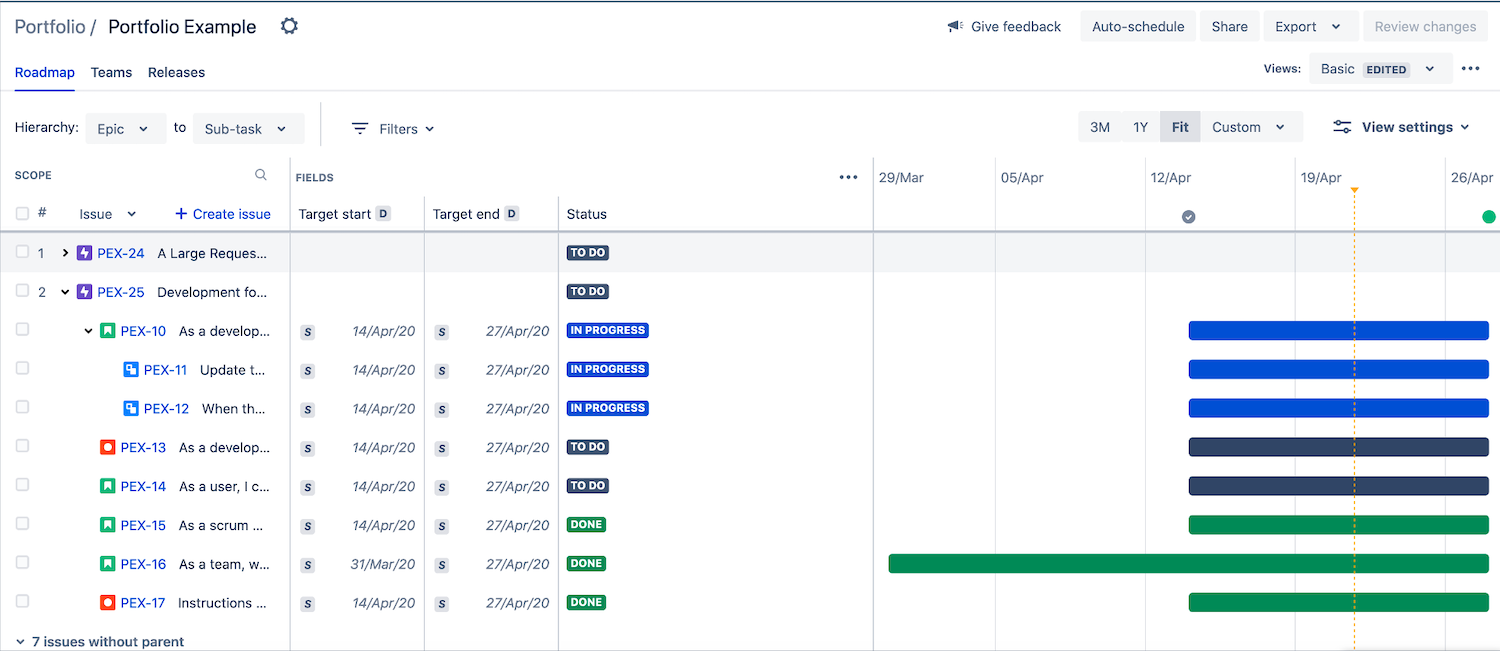
The ways you can view your plans differ between the two available interfaces. When using the improved interface, the roadmap view displays relevant issues in your plan on the left side of the screen and associated timelines to the right. You can customize the roadmap view in many ways, such as by filtering it across a variety of parameters or choosing to view issues at specific hierarchy levels.
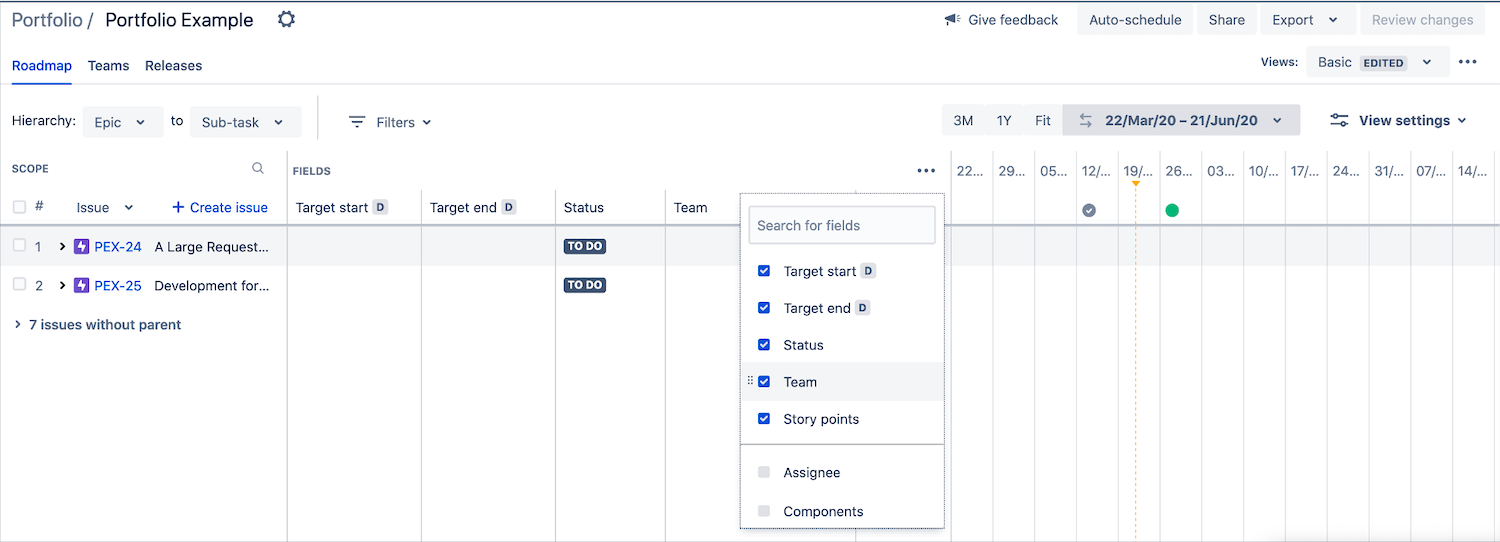
In the live plan interface, the scope view is the best way to get an at-a-glance overview of all the components of your plan in roadmap form. You can access it by selecting the Scope tab. It displays a timeline of all releases associated with the plan, along with the issues that are related to those releases. You can customize the scope view by filtering the display according to specific dates, projects, teams, issue statuses, and more.
Sharing
If you want to make information about a plan or program available to external parties, you can do so by using Portfolio’s sharing feature. Sharing is available in both the improved interface and when using live plans. The improved interface allows you to share roadmaps by exporting plan data or capturing a static image of the roadmap view, while the live plan interface features the ability to generate a variety of reports.
How to Get a Jump-Start on Using Portfolio
Portfolio is more than just a nice-to-have addition to Jira: for many teams, it’s essential for managing complex projects and staying on schedule. We’ve covered the basics of using Portfolio here, but learning how to customize and manage Portfolio to best suit your needs takes time and practice. Familiarizing all team members with Portfolio’s features and incorporating Portfolio into their daily workflows is also easier said than done.
Contegix’s seasoned Jira experts are prepared to guide organizations through the process of aligning Portfolio with their needs and onboarding all team members. As a Platinum Atlassian Solution Partner, Contegix has helped dozens of organizations master Jira and navigate the Atlassian ecosystem. Learn more about how we can help by contacting us today.


